Tuesday, August 28, 2012
Showered in Love
Thanks to my lovely man and his handy dad, I now have a shower!! Which is a very important and wonderful thing. Obviously.
Now gather round and let me tell you a story, so you can learn from my mistakes and also join a special club of people who don't believe in the lies that the-box-something-came-in tells you. TRUST NO-ONE, MY FRIENDS. That is the moral of this story.
Once upon a time there was a naive young lady who thought it might be fun to buy a shitbox house and renovate it. Part of this renovation was redoing the bathroom which of course means replacing a really bad, old, tiled leaking shower with a lovely new one. Assessing the size of the bathroom and the size of her budget, naive young lady purchased a 900x900 shower screen.
LIES. The overall space required to fit the screen is 900x900, but not the screen itself, BECAUSE IT HAS BRACKETS THAT HANG OUT. WAT.
THE END.
Anyway, luckily it didn't make a huge difference to me in this case, but now I shall forever tell, harass, shout from the hills and look any renovating nutter I know straight in the eye even if they don't want my advice and say.... buy your bits and pieces, open the boxes, measure yourself, and then, and only THEN, make plans for where all your stuff is going to go, because to you, the difference between a true 900 and a real 860 might make all the difference.
/rant.
I have a new shower. Aint it pretty?!
Tuesday, June 5, 2012
Many hands and all that jive!
Excited to share the next lot of progress on my house! This weekend (which was actually two weeks ago almost - bit slow with the uploading!) was especially productive because I had the handy help of not only my lovely man, my amazing parents but also the most epic sister in the WORLD!
Have I told you about my sister? No? Well have a seat while I tell you all about how she is my favouritest person in this whole world. Actually no, you don't have the time for that, the story is far too long and intense! Anyway! My awesome sister Mel has been my partner in crime since forever. She's so awesome, that despite having a million jobs to do at her own rennovation, Mel spent the weekend working on my house instead! Told ya she was awesome.
So what did we achieve?
Bath is in, boxed and ready for tiles!
More walls are painted!
(was supposed to be a pic here but Mel will kill me if I post the ones I have of her, hehe)
Have I told you about my third bedroom? This is the bedroom that lost its wardrobe, sacrificed for the good of all and more space in the kitchen. Well this room was the nastiest bedroom of all. Apparently it wasn't enough for gross-old-man to be gross and old by himself, so he had a boarder who was also old and gross. Let's call him, sidekick-old-gross-man. So SOGM resided in bedroom three, must have chain smoked in his sleep, and had the urge to put many many holes in the walls. And hang a nasty towel over it. To make it less creepy.
Up until now, we've been calling this "the room of doom". Well the room of doom is doom-ish no more! It's been scrubbed, bogged, and is almost ready to paint!
It's the last bedroom to be painted, horah! This will be my guest room in the future (I can hear mum complaining from here "but I want the room with the cupboard!". Me: "why? the cupboard is going to be full of my crap!" Ahhh, the thought of being able to unpack all my crap and stash it all over my house....!)
We also had the task of putting together the cupboards for the new part in my kitchen. Arriving "flat pack", apparently the outside parts are called carcasses. "C'mon mum, I want these carcasses in my kitchen!" - sounds charming, right? Who thinks of these things?! Anyway.
The directions we got for the flat pack were crazy! Hand drawn diagrams from the builder (who did us a favour by just cutting the cupboards - his job is actually to put them together and install them, for probably triple the price we paid). Decoding hieroglyphics would probably have been easier! And once Mum and I worked out how it was supposed to work, we simply screwed them together.
Ha.
HAHA!
Let me tell you about that. So I'm thinking, yep, I got this. I can use a drill, I've screwed a screw. And these are even special screws that you don't need to pre-drill a hole for, or countersink. Awesome! But why are these screws so huge? 50mm screws? For cupboards?! Really? He does realise we're not putting together the Titanic, right?
Okay, make sure screw goes in straight. Clearly this is important. So mum holds the pieces, and I line up the screw. Screw slips. Sigh. Apparently the white coated stuff kitchens are slippery. What of it? Start to screw. Drill stops. Curse at drill. Apparently this drill has a clutch. Yep. Because apparently there's people out there who mustn't have eyes in their head, or good motor controls, to know when to back off when screwing something, and need a drill to do it for them. Yeah, that's what I thought too.
Anyway, after much fiddling.... first box together!
This was after we pulled it apart once and re did it. For future reference, its a good idea to take apart all the pieces, and line them up, before drilling. Else you might accidently drill the bases for the other boxes to the sides of one, thinking the bases are the sides. Because you didn't look at all the bits. Just saying.
Oh and for another example of silly references - the feet that go on the bottom the cupboard? They are called chairs. Yep. Work that one out!
The best part of getting the dead bodies, oh, I mean carcasses, done...
So excited to see it in. I could cook a roast right now, if I wanted. How awesome is that?!
And in the meantime, said lovely electrician man of awesome, has been working on the second most important structure on my block of land - no, not the shed - my cat pen!
![]() |
| I have tried a million times to upload this photo the correct way, and it doesn't want to play ball. I take no responsibility for cricks in necks whilst reading this blog. |
It's all dug out ready to have the prep done on pouring the slab. If you didn't know already, I have two cats. They live a happy life of being spoilt rotten by yours truly, and are kept safe and secure, away from roads, dogs, wildlife, other cats and mean people because they remain indoors. I will spare you the rant on my opinion of responsible cat ownership for another time, but lets just say my cats are indoor only! So why the pen? Just because my cats aren't allowed to roam, doesn't mean they aren't allowed to enjoy fresh air, sunshine, butterflies and the wind in their ears. So this area here will be their main cat pen area, with cat flap access from inside the house. They will have beds, hammocks, viewing areas, and their litter trays, all in a mesh run with a roof to protect them from the rain.
I have plans for tunnels and towers that go into the backyard, but the one area will be enough for now!
Also, a huge thank you has to go out to my besty Loz, for coming and scrubbing out my kitchen cupboards for me. We're almost old-man-germ free, yay!!
And all this was achieved without me having a voice for the whole weekend. Torture, I know!
I still struggle to imagine the house done, with all my things in it. It's hard to have vision of the completed project when things feel so close, yet so far away. I know it's going to be awesome once it's done though!
Monday, April 30, 2012
Jess and the Tale of the Painful Architraves
Another weekend, another bunch of stuff done at the house. Have I mentioned how awesome my parents are, travelling 600+km in one weekend to give me a hand?! (Hope any future children I have never plan on rennovating!)
Also, I thought I'd be smart and take my point-and-shoot along to take photos of the things I realised I'd forgotten. Just to come back and realise that it takes worse photos than my phone. Hmph. I really need to learn how to use my "proper" camera - a DSLR that cost me a fortune.
In truth, I did have a little perception that just by purchasing a good camera, my photos would come out amazing, without much effort on my part (I know, I know - I can hear the face-palms from here) - clearly, that's not the case, and I'm not very flash at taking details from the manual and making it work for me in practical terms. This means it's patiently waiting in it's bag, until I have time to learn - which will probably be once I move.
Back to the shitty pictures!
Here is my heater, all lovely and painted (don't mind the dust)
Mum informs me we have to light a fire in the heater before taking inside. This burns off the extra paint, bakes it onto the heater, and means I won't stick the house out. Isn't she a clever cookie?
Take note of the pile of skirting boards behind the heater there. Very soon I'll be turning the shed into a one woman sanding and painting station!
Also I remembered to take photos of my "arch":
| Front - finished |
| Back (hallway side) |
I swear to my mum that I will never forget the hours of work that went into this, and I will never ever remove a door frame again, so mote it be.
Bathroom update! I wanted to show off my pretty floor, but instead you get to view it with plastic taped over it. Dusty plastic.
| Shower Niche |
| Steven getting dusty.... |
| ...to fit my bath! $99 for something I'm never going to use |
| Bath Niche! |
| Mum's handy work on the ceiling |
After Steven working on the bathroom the whole weekend, it's water proofed and ready to be tiled in a fortnight!
Now let me tell you about architraves. You know, the frame type bits that go around windows and doors. Well we originally took them off from around the doors, thinking we'd have to trim them and put them back on once the flooring goes down. Turns out that there's a little cutter we can use for that job, so I had to put the architraves back on. I was semi-clever when removing them, and wrote on each one where it was from ("B3 to Hallway - left"), and thought this would make putting them back on a breeze. Ha. HA!
I imagined the process to go:
1. Identify correct arc
2. Line up arc in door way
3. Nail on
4. Hole punch in nails
5. Putty nail holes
6. Sand, undercoat
7. Celebrate my general awesomeness
The true process?
1. Identify correct arc
2. Attempt to line up. Pinch finger. Swear. Wonder why something that used to meet perfectly, no longer does. Finally wiggle arc to meet top piece perfect. See what gap isn't even all the way to the bottom. Swear.
3. Give up on lining up, and settle on fact gap filler will fix it. Attempt to hammer in nail, whilst standing on trusty milk crate. Drop nail. Realise I probably need awesome accessories like a belt bag to hold hammer and nails. Tell mum I need cool accessories. Get lecture about how other people don't achieve great things because they think they need certain items to get a job done.
4. Whinge long enough to have mum come and look. Mum tells me that hard wood is hard. Gives me the "look". Tells me to predrill holes.
5. Locate drill. Sift through massive pile of drill bits (Steven has all the things, but has an organisational system no-one could possibly follow). Announce to no-one in particular that when I have a drill my drill bits will be in a nice little holder.
6. Predrill holes
7. Line up arc again, this time meeting perfectly. Start to nail. Get half way through and realise its moved. Pull nail out. Swear.
8. Decide nailing further down is easier, then pull top into line with final nail. Celebrate first arc on, in under an hour!
9. Attempt to hole punch nails in. Whack knuckle. Swear. Have frustrated mum show me to how to properly use nail punch. Still get Steven to do the tricky ones.
10. Take crappy pic with camera focusing on wrong thing in celebration.
All I can say is, I wish I had Mandi Tremayne's nail gun of awesome. (If you have not read her blog, you so need to! Mandi is an amazing DIY lady, mother of 4, tells hilarious stories about her kids and takes amazing pics of the whole process!).
Anyway, all the arcs are on, undercoated, and ready to go. And at this point, I'm not thinking about the pile of previously-mentioned skirting boards. Nuh-uh.
Did I mention the heat pump relocation?
Here is the wall where it was. Mum's amazing plastering skills made the holes dissapear. I probably wouldn't have worried too much about moving it, except I didn't want to be breezed upon when eating dinner, and also, this is the only wall for my prized piece of furniture - a colonial kauri pine dresser Mum lovingly restored for me a few years back. I love my dresser so much, I wouldn't have bought the house if there hadn't been a suitable place for it. Call me picky, but when I love something, I rarely compromise. So the heat pump had to go.
And here's where the heat pump is going. It'll create it's little annoying breezes over the wood heater. This will help circulate the heat, and Bird informs me that it'll actually work quite efficiently with the wood heater. Yay!
You might have noticed in the first picture of my house, the heat pump unit sitting out the front. It's a bit of a pet hate of mine, the outside part of the unit on display like some sort of ugly garden feature. Seeing as we were locating the unit to the other side of the house, I thought it would be a good chance to move the unit as well. Bird was keen on this idea, until I said I wanted the unit on the roof. I think the conversation went something like,
Him: "So you want it on the roof. I don't even know if you can put one on a tile roof".
Me: "But the unit is soooooo ugly and I might want to put on a deck some day and if it goes any further that way it'll be close to my bedroom window and I'll be able to hear the fan going and-"
Him: "Okay, fine, on the roof will be fine" *sigh*
So that's how it went from here:
| Please ignore strange crator... |
Ugliness avoided. Happy Jess!
In the meantime, Mum has continued plastering and painting. I took a photo, but she said "don't take photos of me!". Okay Mum, you've avoided the blog, this time.
She's been itching to get the window colour on, and now we get to see all the colours finished!
I wanted gloss windows, but Mum said matte would be better. We settled on a satin, and I'm pretty glad because it's true what they say about gloss showing up everything. Including my poor undercoating skills. Woops. Mum wouldn't let me pull off the tape (sad face). Next weekend, she said.
It was also the first time we'd been at the house when it was raining! Pretty amazing for Tasmania. I even got to see snow on Mount Wellington out my loungeroom window, if only for an hour or so in the morning.
The mountian disappears in poor weather, apparently. I'm going to enjoy my new view!
Monday, April 23, 2012
Where I've been all this time!
So I thought it was about time that I let you know what I've been doing for the past 4 months! I've spent the last year making changes to almost all parts of my life - it's been an exciting, refreshing and much needed journey of goodness, with a dash of rough times just to add flavour to the mix.
On 19th December 2011, after much annoyance in the general direction of a real estate agent, a power of attorney and an old man vendor, I received the keys to a home of my own! A house, that's all mine (other than the mortgage to the bank, of course). A space for me, and my cats, and my car. No-one elses. My own little haven of my stuff and my mess and my music and things however-the-hell-I-want-and-no-one-else-gets-a-say-so-NER!! After living at home for nearly a year, with all my things packed away in boxes, cramped in a sweet but somewhat inconvenient attic room, to say this moment was exciting was perhaps an understatement.
| Pic as per the real estate agent |
The first time I layed eyes on this house, on a real estate website, I knew it was the one. Right suburb, right size, double garage, nice backyard, and most importantly, right price! I knew I had to make it mine.
This is the part where I could tell you about how much I hate real estate agents, but I will spare you the story. Lets just say that the car sales industry doesn't deserve it's reputation compared to real estate agents...
So how does a mid-20's person afford a house in a great suburb in Hobart on one wage? Glad you asked!! Peer at that picture above again. Looks great, huh? How about the back yard, would you like to see that?
| Also from the agent - dog not included, thank GAWD! |
Look at all that space! Double garage! And in that left hand corner, an apricot tree! I am in love.
But back to affording this house. Let's break it down into small sentences:
Old man. No wife. Alcoholic. Heavy smoker. Pretty convinced he would melt if fresh air or sunlight entered said home.
Yep. As nice as this place was on the outside, it was horrible on the inside. Stay inside for 20 minutes and start to get a headache from the smell, horrible. I thought the windows were tinted, but they were actually niccotine stained. The carpet probably started life out as a different colour, but black/grey/stained was the status quo. And wow, I wonder how many flies it took to put that much crap on the ceiling?
But hey, I'm brave, and I happen to have a pretty talented family, and a lovely boyfriend who can hook up a wire or two. This was about the time I started to have visions of me like those people on TV who look gorgeous while happily rennovating amazing homes where everything goes right and turns out awesome....
Perhaps it's the fact I grew up around building sites and work in progress. Perhaps it's because my mum is this amazing woman who can pretty much do anything when it comes to building and rennovating and decorating and anything else she sets her mind to (and I'm her daughter, so surely some of that's rubbed off?). Perhaps it's because every other place in my teeny tiny budget was horrible, and with every other property in the suburb priced at least $100k more than this one, and I saw it as a good investment. Perhaps it's because I'm slightly delusional, slightly eccentric, overly optimistic and have illusions of grandure, that I thought this was a totally doable, awesome plan. Whatever it was, (or a combination, maybe) I decided that I could do this!
Oh, and I was silly enough not to take "before" photos. But I did take a video! Which I'm not showing you, because it's terrible. For my records only, that one!
A skip bin of stuff later, I was left with a house with no window furnishings, floor coverings, oven, or bathroom. My motto was something like "if it has old man germs, it's gotta go".
Have you ever pulled up cork tiles? No? Then you're lucky. I think scraping these things up was one of the most physical things I've ever done in my life.
And I got the easy parts.
| I'm pretty sure he's thinking "why did I ever agree to do this?!" |
Unfortunately I also don't have a photo of the moment when my lovely man started adjusting the taps of the soon-to-be-removed bathroom vanity, without turning off the water mains. Imagined a stressed out, sopping wet dude trying to control an amazing water fountain which had appeared in my bathroom. I'm pretty sure this image was my happy thought for at least a week!
The result of our work was a empty, less stinky house.
![]() |
| Dining Room. Heat pump taken down to relocate. |
| Bedroom 2 |
| You have no idea how much I scrubbed this toilet.... |
| Soggy laundry |
| Hallway, obviously |
Once again I was a little lame on the pictures, woops.
The next stage was making a few changes. Firstly, in the kitchen, the oven was in a hovel. A what? Lemme show you:
| Real esate photo. Wide angle lense makes the oven look bigger, but its a standard 60cm wide |
The oven was squished into this little hole in the wall. No lighting meant you'd be cooking in your own shadow (pet hate). Close walls meant if you had a pot or wok bigger than the hotplate, it had no-where to go. Complete fire danger in my opinion!
I have to be honest - I didn't even open the oven. After seeing everything in the house, I just didn't want to know. It was a pleasure to toss it in the skip bin!
See what wall on the right side of the oven? The one with the shelf? That's the built in wardrobe for the third bedroom. Was. I decided that a built-in in the 3rd bedroom was not necessary, compared to a bigger kitchen, so Bird and my step-dad made my wishes come true!
I can see it now - tiles up the wall, glass and stainless range hood, glass hot plates, practical drawers either side of the oven, down lights, maybe even some cute narrow cupboards with window-like glass doors...
| Image from Pintrest, orginally from who-knows-where |
...and every single meal that comes out of this kitchen will be amazing, because how could it not?!
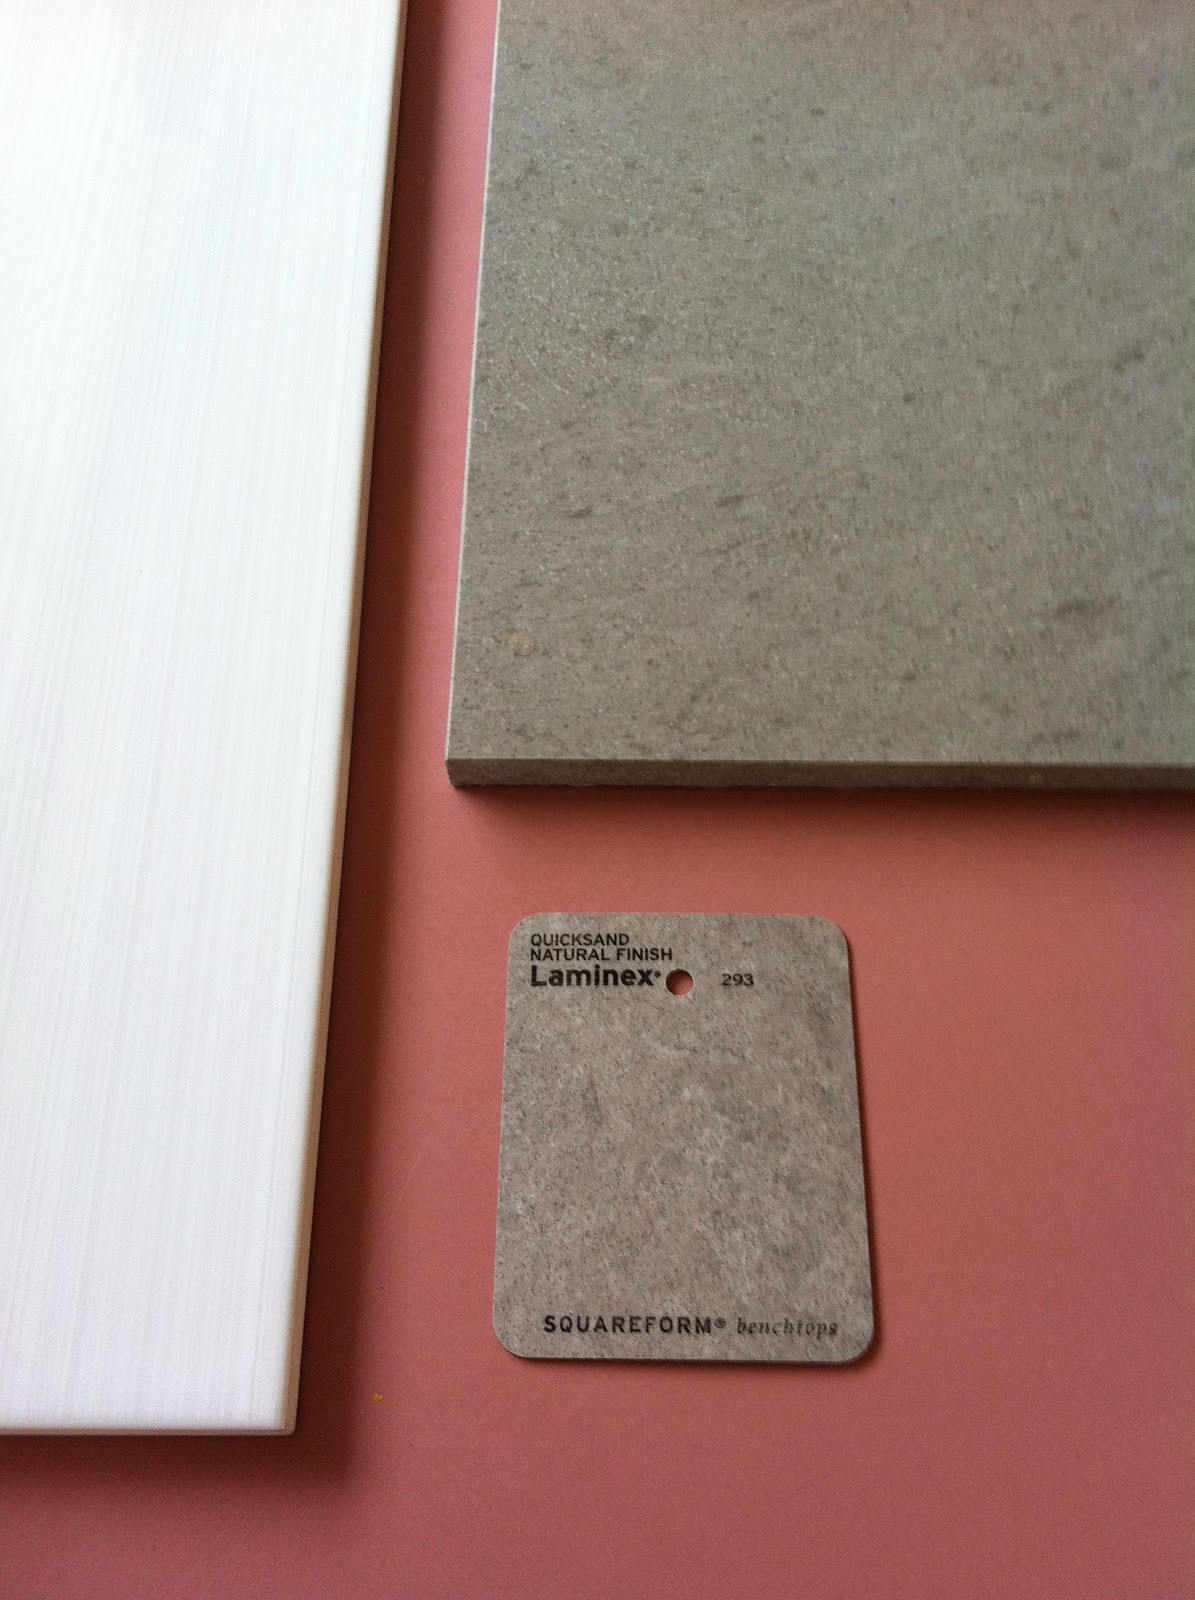
Now let me tell you a little thing about tiles and laminex. Seeing as mum works in a tile shop, you think I'd know a thing or two about them. Turns out, not really.
Grey isn't grey, white isn't white, and if you think it'd be easy to get a particular colour, you're probably wrong. The prettier they are, the more expensive they get, and there's a huge difference between what you like, and what is essentially suitable for an investment property (read: boring, normal, classic, affordable). New motto: "this isn't going to be my forever house". Is there even such thing?
Laminex is tricky, but in a completely different way. Oh, the options!! I never knew "grey" could be so hard to get! And those little business card sized samples they have? They aren't really a sample, because if you get a bigger piece, the colours look completely different and the sample sometimes doesn't show the whole pattern!
Now, my heart, my love, when it comes to benchtops, actually lies in timber. You can take the girl out of the country...
But, see new motto mentioned above. Laminex is a cheaper, more wearable, better-for-resale option.
So there I was, with my ba-zillion different samples, frustration levels increasing, when my amazing man gave me this simple advice:
"Go with the one you liked first. Whatever it was that drew you to it to begin with is right. And once it's on the benches, you'll only notice it for the first few weeks, and then it'll just blend into the normal and you wont even see it."
What did I ever do to deserve such a lovely, wise man?
So, voila:
On the left is my kitchen tile, at the top is my bathroom floor tile, and the laminex I decided to go with, called "Quicksand - natural finish".
Did I mention that I have the awesome choice between two heating options? I am so excited about this. The house has a heat pump - my last place had one, and they are great. Heat with the flick of a button, and fairly efficient too. But since moving home, I've fallen back in love with wood heating. Nothing beats the heat of a wood fire - they are nice to back up to, dry clothes with, stare into the flames, and also keep my cats nice and toasty!
Despite the abused state the rest of the house was in, the wood heater was surprisingly neat and tidy. The brick hearth had to go however (stubbed toes anyone?), and the heater had a little bit of surface rust and needed a clean and tidy (eliminating old man germs, remember).
Mum came through with the great plan, of course, and now I have a lovely modern, bigger tiled hearth which will be flush with the floor.
This is the point where I become the chief cup of tea maker because I have no idea what's going on!
The result?
Pretty damn awesome, I think! I can't wait to get the heater in, all prettied up in metallic charcoal.
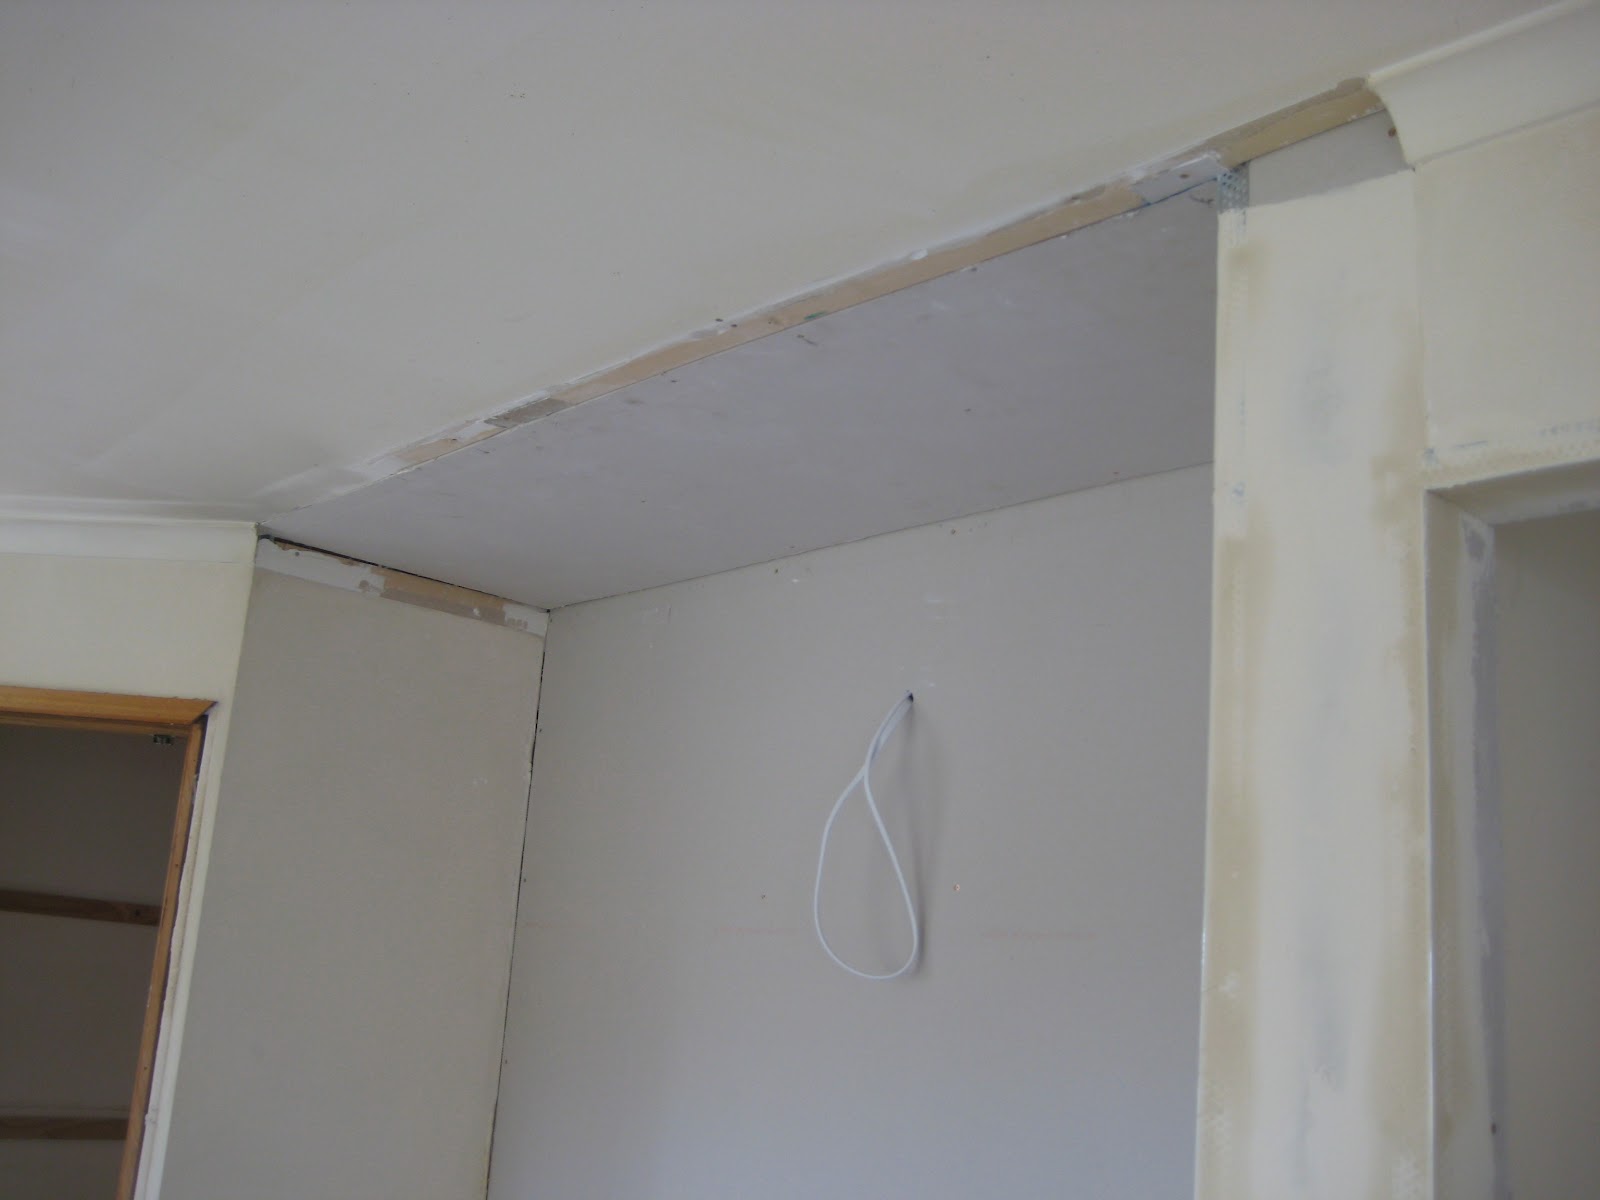
Oh, and in that pic, notice the door frame going down the hallway? Well I decided I didn't need a hallway door. It'll be open all the time anyway, so may as well take it off. Once the door was off, I made the executive decision to remove the door frame. Else it'll be obvious I've taken a door off, right? I think my mum wanted to kill me in that moment...
See, I didn't realise that plastering and bogging up an "arch" (apparently it's still an arch, even if it's not arch shaped - go figure) is actually a massive pain in the butt. Woops. Sorry mum!
However after much work she's made it look amazing (of course)! Pic to come later.
The bathroom has been the other big project. Other than being hideous in general, the original shower had leaked, and rotted away the skirting board, plaster and some of the internal stud work. Also, some strange person decided it would be a good idea to install a door from the main bedroom, to the bathroom. Perhaps in some situations, this would make sense, however in this house, it saved, oh, maybe 1 step?
Let me show you in a diagram...
So, if you take the normal door, its about 3 steps to the bathroom. Or, you could take the "ensuite" door, and save yourself.... wait for it... ONE WHOLE STEP! That totally justifies having a random door!!
Needless to say, the door is no more, which was a little easier than taking out the "arch" door, because the wall had to be fixed and replastered anyway, like most of the bathroom. See?
| Real estate photo, featuring lovely pink vanity *puke* |
![]() |
| Yay! No door! Yay! No rotten stuff! |
Okay, so now I realise that I really do suck at taking progress pictures. Since this last image, the drain for the vanity (the pipe in the floor) has been moved to be in the wall, ready for a wall hung vanity, and the plaster has been installed. My awesome plumber friend Reegan has realigned the taps for the bath so they are centre with the window, and mum has been working on her idea for a niche. A niche? I thought a niche was a special group of people who are into a particular thing "yes Mavis, your beautiful frilly toilet roll dolls with the pink bonnets will be perfect for a niche market of people"... apparently it's also a cavity in a wall, perfect for displaying bathroom things and giving you a place to stash your shampoo. Who ever knew?
My bath and my shower are both getting a niche. Lucky them! We've also had the lovely Dean come and tile the floor of the bathroom, and fix the shower - see how the drain is off centre? My mum wouldn't have it, so Bird chipped out the shower base, and Dean made a new one. The grey tile looks great, and I can't wait to see the rest done. White tiles on the walls, all the way to the roof, should look good despite my cleaning allergies. Seriously, I'm allergic to cleaning and scrubbing. Just ask my mum!
That's probably enough of an update for now! I've been itching to share what I've been up to with everyone :)
Subscribe to:
Comments (Atom)


